How to Store Fresh Onions and Baby Red Potatoes
During the wintertime months, when the ground is covered by a thick coating of snowfall, in that location's something peculiarly satisfying nigh still being able to eat food from your garden. There are many summertime-grown crops including potatoes, onions, garlic, beets, carrots and wintertime squash, can be stored with relative ease to nourish y'all right through until the side by side growing flavour. Even a small-size garden can yield a substantial crop of wintertime keepers.
To exist successful storing these keeper crops at home, here are a couple factors to keep in mind:
- Some varieties shop better than others, and then exist sure to seek out the ones that are known to exist good keepers.
- Crops that are harvested at their prime number ? not before or subsequently ? store all-time. Time your plantings so they mature at the close of the season.
- Just first quality, unblemished produce is suitable for storage.
- Optimum temperature and humidity for storage varies by ingather, so be sure that the crops you programme to shop match the storage conditions you lot tin provide.
Potatoes
There are and then many wonderful kinds and colors of potatoes to choose from: fingerlings, bakers, boilers, white, xanthous, pinkish, red, and fifty-fifty blueish. All are delicious eaten fresh from the garden, but if you want to store some potatoes for eating in the late fall and winter months, you'll need to establish varieties that are well-suited to storage as well as to your growing surface area. Readily bachelor potato varieties known to be excellent keepers include Katahdin, Kennebec, Yellow Finn and Yukon Gilded.
Potatoes tin be grown in a standard garden row, in a raised bed, or in a container such as a Potato Grow Pocketbook. The more than leafage your plants have, the more proficient-sized tubers yous'll harvest, and so information technology'south of import to proceed your plants equally salubrious as possible.
In tardily summertime when the potato leaf has died back, your potatoes can exist dug and "cured" for storage. Curing toughens up a spud's pare and extends its storage life. Cure the tubers by laying them out on paper in a well-ventilated place that's cool (50 to 60 degrees F.) and dark (and so they don't turn green). After nigh two weeks, the skins will have toughened up. Rub off any large clumps of dirt (potatoes should never be washed before storage) and choose any damaged tubers, which should be eaten, not stored. Care for the tubers very gently so as not to trample or cut them. Nestle your spuds into ventilated bins, bushel baskets, a Root Storage Bin or a paper-thin box with perforated sides. Completely comprehend the boxes or baskets with newspaper or cardboard to eliminate any light. Even a picayune lite will cause potatoes to turn green and exist rendered inedible. The ideal storage temperature for potatoes is 35 to 40 degrees, though they will usually go along for several months at 45 to l degrees.
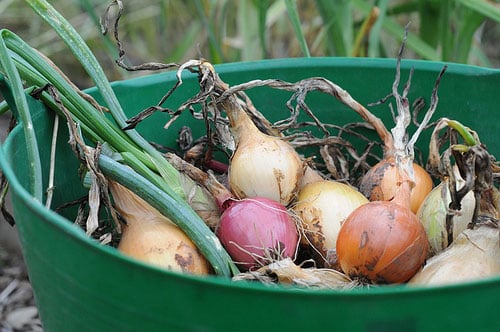
Onions
Wet summers are bad for picnics but groovy for onions. The more than moisture onions go, the larger they grow. Onions besides benefit from lots of lord's day, and will sulk if they're crowded by neighboring plants or weeds.
Onions should be cured before they are stored.
Consider starting your onions from seed or young plants, rather than purchasing the little "onion sets" you lot can buy in the leap. Onions grown from sets rarely store as well as seed-grown onions. Growing from seed besides allows you choose a variety that's known for long storage. Stiff-flavored, pungent onions store all-time (the same chemicals that make onions pungent make them skillful keepers). There are both red and yellow storage onions; those extra-large, milder onions should be eaten fresh every bit they don't shop well.
Onion seeds must be started indoors, several months earlier they're planted into the garden. Broadcast the seeds so they are about 1/2″ apart and cover lightly with soil. Once the plants are up and the stems have straightened, trim the tops with scissors to a height of about 2″. Repeat every couple weeks (sort of similar trimming a Chia pet) until it's fourth dimension for your onion plants to go into the garden. These haircuts force energy into the roots and as well keep the plants from toppling over. Onions are heavy feeders, so be sure to amend the soil in the planting surface area with compost and a granular organic fertilizer. Set up the seedlings (which may be less than one/8″ in diameter at the base of operations) about half-dozen″ autonomously in each direction. Continue them well-watered and well-weeded, and make sure they don't get shaded past neighboring plants.
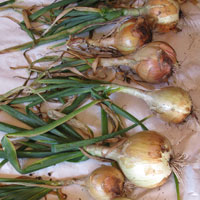
A harvest of several types of onions. In general, red onions and yellow onions are good keepers; white onions are not as good.
In late summer, the leaves of onion plants flop over. This signals that it's time for the plants to stop growing and start preparing for winter. Allow the plants to remain where they are until the necks brainstorm to tighten and the leafage yellows. If the weather condition is dry out and there'southward no danger of frost, onions can be harvested and laid right on top of the soil to dry for a calendar week or 2. If the weather is wet or frost is possible, harvest your onions and move them immediately into a protected location where they will stay dry. The flooring of the garage or a covered porch works well. Spread the onions out in a unmarried layer and allow them "cure" for 2 weeks. During this time the necks will wither and turn brown, and the papery skins will tighten around the bulbs. Once the necks have dried and there's no more than moisture in the stalk or leaves, you can bring your onions indoors and shop them in mesh bags or bushel baskets. Proceed them absurd (35 to 45 degrees F.) and abroad from light. Another technique for storing an affluence of onions: make caramelized onions. For details, read Making Caramelized Onions.
Garlic
Dwelling-grown garlic is a valuable crop. It's piece of cake to abound all you demand for twelvemonth-round use, and the quality just tin can't exist shell. There are lots of different types of garlic available at present ? read the seed catalogs advisedly and cull one that's well-suited to your location. Common cold-climate gardeners normally grow strong-cervix varieties, which are hardier. In warmer climates, the soft-neck garlic varieties (which can be braided) are more popular.
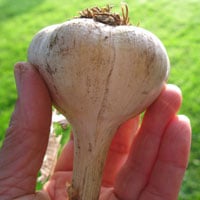
A perfect bulb, just after harvest.
Garlic doesn't crave much infinite. A 2 ft. x 12 ft. bed can yield enough garlic for a family, with plenty of extra heads to plant the side by side year'south crop. Cold-climate gardeners plant their garlic in late fall for harvest the following summer. Warm-climate gardeners may find that a tardily-wintertime planting (February to March) is best. Yous can even grow garlic in a Garlic Grow Bag, which is 36" diameter ten 12" high. Each bag hold 18 to twenty cloves.
Plant individual garlic cloves (the bigger the clove you plant, the bigger the caput you lot'll harvest), setting them 4-v″ autonomously in all directions and just deep plenty to cover the top of the clove. Water thoroughly. Subsequently the start difficult frost, cover the entire bed with straw. Remove the mulch in early spring.
Garlic has the same growing requirements as onions. Proceed the plants weeded and well-watered, and requite them lots of dominicus. Calculating the correct harvest fourth dimension is a little trickier. Dig the plants when the second fix of leaves begins to yellow, which may occur as early on as July. If y'all wait as well long to harvest, the cloves volition begin to separate as they dry, and the heads won't store as well.
Cure your garlic in a dry, dark place just like you would onions. Sort out and save the biggest heads for planting next autumn. By planting simply the biggest cloves, you'll gradually become bigger and bigger heads each year and will never need to buy garlic once again.
The optimum long-term storage temperature for garlic is 35 to 40 degrees F. In warmer temperatures, garlic volition begin to sprout. Dryness and complete darkness are essential.
Winter Squash
Winter squash are fun to grow and piece of cake to shop. In that location are dozens of varieties, from the traditional acorn, Hubbard, butternut and buttercup, to spaghetti, delicata and golden asset. Pie pumpkins, too! As with other storage crops, some squash varieties store well and some don't, so choose accordingly.
Squash can be grown in raised beds, but they should be immune to ramble outside the boundaries of the bed. Another option is to train the vines on sturdy trellises.
Squash plants accept upward a lot of infinite, simply they're not fussy about where they grow. Y'all can commonly plan on harvesting one or ii good-sized squash from each found. The usual recommendation is to put two to three plants (or seeds) in a little grouping, and space these "hills" most three-feet apart.
Don't found your squash until the soil has warmed and all danger of frost has passed. Young squash plants appreciate protection from insects and harsh weather, and will thrive under garden fabric (row cover). Fertilize at planting time, then forget about the plants until the showtime light frost, when the leaves will die back and reveal your crop.
For long storage life, when harvesting winter squash it'south important to leave some of the stem attached to the fruit. The best mode to ensure this happens, is to apply a stout knife or pruning shears to separate the stem from the vine. Afterward harvesting, let your squash cure in a warm place (75 to 80 degrees F.) for ten days or so. When ready for storage the outer skin should be very firm.
Store winter squash in a cool (to to 60 caste F) place that's well ventilated. Humidity should be relatively depression: thirty-50%. Check your stored squash monthly to identify and employ up any fruit that shows sign of decay.
Beets and Carrots
For winter storage, choose beet and carrot varieties known to be good keepers. Vegetables store best when they're harvested at — not past — maturity. This is peculiarly true for beets and carrots. In about areas, this ways that crops intended for winter storage are not sown until belatedly June or July.
To maintain skilful eating quality, carrots and beets need to be kept at a constant temperature of between 32 and xl degrees F, and at ninety to 95 pct humidity. There are 3 means that home gardeners tin provide these ideal storage conditions: in a refrigerator, in moist sand or right in the garden.
To shop these crops in a refrigerator or in sand, start by harvesting the roots. Handle them gently to avoid bruising or nicking. Use scissors to cut off all but i/2″ of the leaf. Rub the roots gently (do non launder them in water) to remove well-nigh soil. Don't cut off the root cease considering this will invite decay.
For refrigerator storage, prevarication similar-sized, same-diverseness vegetables in a single layer in gallon freezer bags. Remove equally much air as possible earlier sealing each handbag. Stack bags apartment on a shelf or in a drawer in the refrigerator. Check monthly for decay and use those first. Beets will stay hard and sugariness for five months or more; carrots should concluding almost every bit long. Should there be fine root hairs or a picayune disuse, just peel this off; the root itself volition be fine. Carrots and beets can be shredded raw into salads, or can be parboiled, added to soups or stews, or roasted.
A second technique is to shop these crops in moist sand. Prepare the roots every bit in a higher place. Moisten clean sand in a large container or wheelbarrow. Pack the vegetables into a tub, wooden box, v-gallon bucket, plastic-lined cardboard box, or a Root Storage Bin. Starting time by placing several inches of moist sand on the bottom of the storage container. Lay vegetables on the sand in a single layer, not touching each other. Embrace them completely with sand and keep layering until box or bin is full. Top with a layer of moist sand. Container volition exist heavy when full, so plan accordingly. Remove the stored vegetables as needed.
A third technique (for cool climates) is to store these crops right in the footing. Earlier hard frost, cover un-harvested carrots and beets with a 12-xviii″ layer of straw or leaves. (The shoulders of beets are susceptible to frost harm, and so be sure to cover them before heavy frost). Elevator back the mulch and harvest equally needed. If spring comes before all the roots accept been harvested, dig and utilize them up before the soil begins to warm.
How most storing those lesser-known root crops? Rutabagas shop well in the refrigerator; prep and shop as for beets and carrots. Parsnips may exist stored in clammy sand or can exist left in the ground under mulch. Celeraic can be stored in either the refrigerator or in damp sand.
Source: https://www.gardeners.com/how-to/storing-potatoes-onions-garlic-squash/5021.html
Post a Comment for "How to Store Fresh Onions and Baby Red Potatoes"